Do you have an idea that the
online marketing campaign that’s driving the maximum traffic and business to your website?
One of the most crucial aspects of being a great marketer is being able to measure success. It could be of anything, whether you can be marketer employed by someone or you are your own boss. In every aspect of your business, you need to measure your business growth and downfall.
In this case, no matter what the matric is but the thing is you want to prove to your boss or the company at large. You may exceed your goal or maybe need more of it. You may need to hire more personnel to supplement your marketing activities. So, all the activities I have mentioned here is the outcome of measurements.
Measuring the outcome or impact can be tricky without having the right tools. For instance, you know that Twitter drives a certain portion of traffic to your website but do you know what particular company’s tweets were driving more traffic?
Or you might posts on several websites as a guest but do you know that your specific guest post drove actual leads and customers to your website?
But the thing is that you can prove all that with a few special codes added to the end of your URLs. Basically, they are called UTM codes.
What are UTM Codes?
UTM codes, also known as UTM parameters, are little snippets of text that are added to the end of your URL to help you track the growth of your content on the web.
Adding the snippets of code after the question mark doesn’t affect anything on the page rather it just allows your analytics program know that someone arrived through a certain source or overall marketing channel as part of a certain campaign.
Why & How Things Work
The main reason for using UTM codes is to aware Google Analytics to inform you where searchers came from and what campaign directed them over to you. In the process of transferring information over to you through analytics, usually, a vanity URL is used that is created by Google’s URL Builder for each offline campaign directed.
After creating the URL, then it is redirected to whatever forwarding address you assign to it. This is how you will track how a radio ad, TV Commercial, or a weekly newspaper, and other agencies is working without creating a custom landing pages for each campaign.

You need to create separate UTM based URL for specific campaign like TV commercials, print ads, and even for backlinks so that you can get individual separate data for each campaign. Moreover, you will track not only the source and the medium but the campaign name as well.
Using Google analytics you can now track your offline campaign without any hassle. You can easily find the companies or blogs that are generating your traffic.
Using UTM codes you can track 5 most important things:
- Campaign: Contents from one campaign in your analytics.
- Source: From which website your traffics are coming.
- Medium: Type of marketing medium.
- Content: Used to track the different types of content.
- Term: Used to identify the keywords you have paid for in a PPC ad.
One of the best part of UTM is you can make any combination using these code. Let’s have a look at the practical usage on how to create and use them.
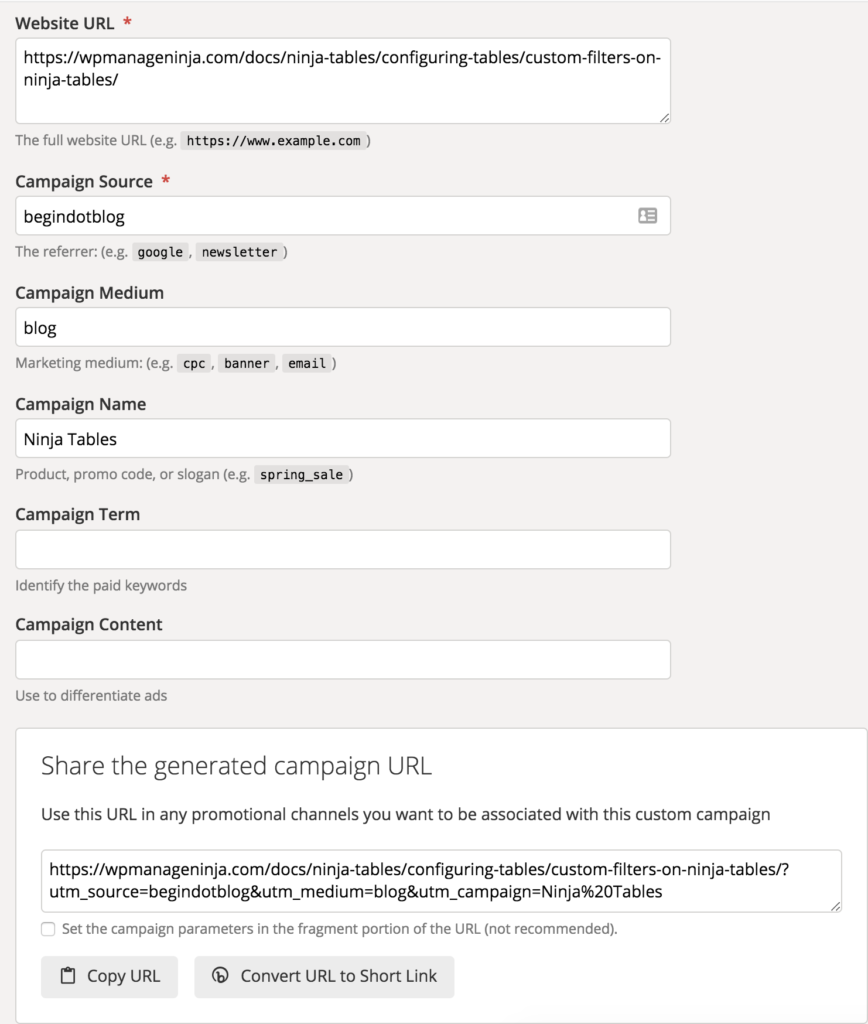
First of all, you need to go to the Google Campaign URL Builder site. In the Google Campaign URL Builder site, you will find a form with several input fields to make things happen.
In the first place, you will see an input field for Website URL, in this input field you need to put the URL that will drive the traffic to your page.

Above image shows the input field and how to fill it. Next, come to the Campaign Source input field. In this field, you will put the name of the source of your traffic using the given link that means the referrers. They are the platforms (or vendors) where the traffic originates. They can be google, newsletter, or any blog of a particular blog site. Here is the visual look of the input field.

Basically, using these two input fields of the Google Campaign URL Builder form, you can create UTM link but if you want to things more specific and friendly, you can fill up some other input fields as well.
In addition to this, you will find the Campaign Medium input field. You can use this to recognise the medium like Cost Per Click (CPC), social media, affiliate or QR code etc.

Next, Campaign Name Input field, this is used to identify your campaign. This could be your website or specific product promotion and so on.

Then you will find Campaign Term that also used to help to track your keywords during a paid AdWords campaign or anything like this. You can also use it to identify aspects of your audience in your display ad campaigns.

At last Campaign Content, this input field is used to different analytics like A/B Testing and you can also use it to differentiate links that point to the same URL.

These are to total required input fields for creating a UTM link.
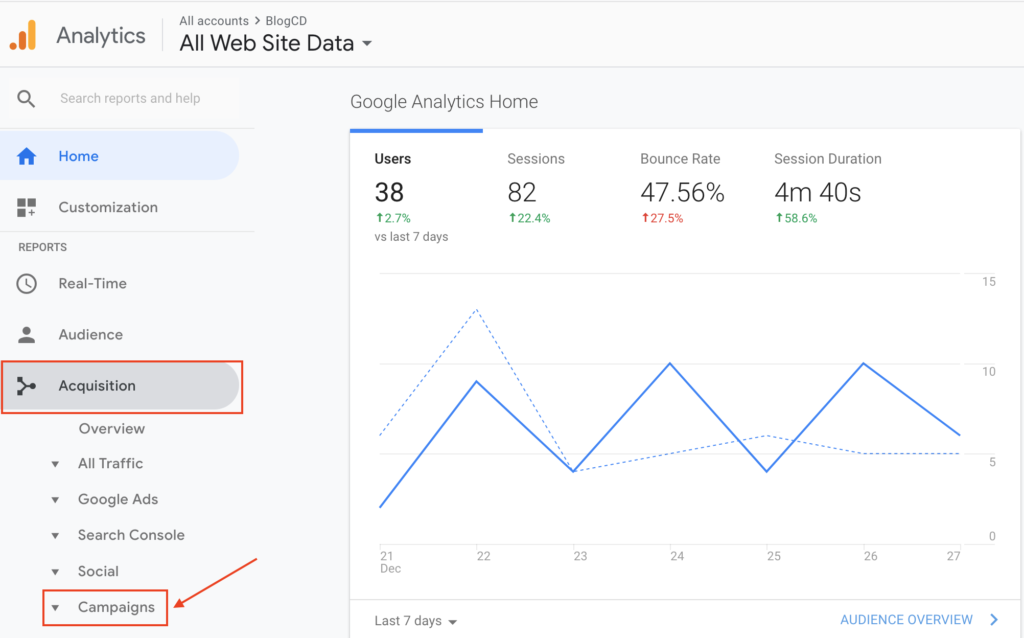
If you already have Google Analytics set up for your site, Google will dynamically track incoming campaigns you set on the Google Campaign URL Builder form. Like in BlogCD, you can access them under ‘Acquisition,’ then ‘Campaigns.’ Click on each campaign to view the source and medium.

And that’s all about it — you’ll have custom tracking codes set up and running in no time! In a few weeks, you’ll be able to make a case for what you need because you’ll have the right metrics available.
Hopefully, this article helped you much in this particular context. If you have anything to share, just leave me a comment below in the comment box.

